Product OverviewPressure Sensor Dies - Pressure Measurements Methods
The high precision of piezoresistive sensors and their ability to measure absolute, gauge and differential pressure allow their versatile use in a wide range of applications.
For industrial equipment and machineries the information provided by the pressure sensors can be used to operate hydraulic or pneumatic equipment in the most effective way but furthermore connect to the new
The increasing requirements in automotive for fuel efficiency and reduction of harmful emission demand for long-term stable and highly accurate sensors. Besides the media resistance, some of the application require the pressure sensors to be freeze resistant but most important the sensors need to provide a reliable signal over lifetime.
All applications place increasingly demanding requirements on the distinctive characteristics of the pressure dies and call for specific design features already on the die level. The TDK pressure sensors portfolio has been developed with a strong focus on increased sensitivity and high performance with a smaller die size. In addition, particular attention is paid to specific features for media resistance and easy process ability.
Contents
Piezoresistive pressure sensing methods
| Absolute | |
|---|---|
| Gauge | Differential | |||
|---|---|---|---|---|
Piezoresistive pressure measurement
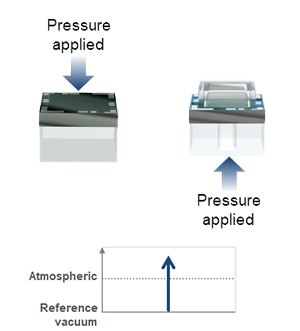
Absolute pressure measurement – front side
The reference vacuum is created by bonding the glass under vacuum to the silicon. The medium to be measured comes into contact with the active electronic components on the front side of the pressure sensor die.
| Type | C32 | C43 | C33 | C39 | ||||
|---|---|---|---|---|---|---|---|---|
| Dimension: | 1.65 x 1.65 x 1.1 mm³ | 1.65 x 1.65 x 1.1 mm³ | 1.0 x 1.0 x 0.4 mm³ | 0.65 x 0.65 x 0.24 mm³ | ||||
| Media: | Dry non-aggressive gases | Dry non-aggressive gases | Dry non-aggressive gases | Dry non-aggressive gases | ||||
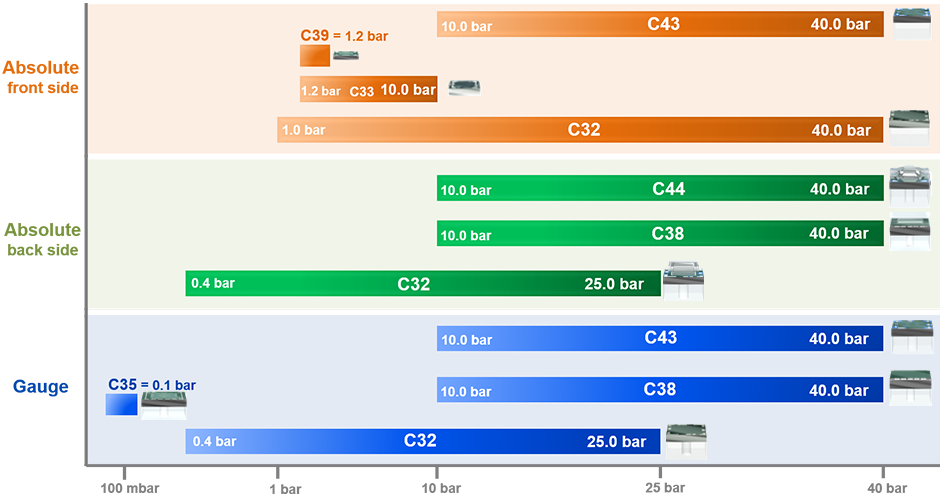
| Pressure range: | 0 … 1.0 to 0 … 40 bar | 0 … 10 to 0 …40 bar | 0 … 1.2 to 0 … 10 bar | 0 … 1.2 bar | ||||
| Temperature range: | -40 °C to +135 °C | -40 °C to +135 °C | -40 °C to +135 °C | -40 °C to +135 °C | ||||
| Features: |
→High temperature coefficient resistance on request |
→High temperature coefficient resistance on request |
|
|
||||
| Cross-section: | ||||||||
Absolute pressure measurement – backside
For non-aggressive gases and fluids the reference chamber is created on the front side by an additional glass cap.
The media is being applied to the backside entry.
| Type | C32 | C38 | C44 | |||
|---|---|---|---|---|---|---|
| Dimension: | 1.65 x 1.65 x 1.5 mm³ | 1.65 x 1.65 x 1.5 mm³ | 1.65 x 1.65 x 1.5 mm³ | |||
| Media: | Non-aggressive gases and fluids | Non-aggressive gases and fluids | Non-aggressive gases and fluids | |||
| Pressure range: | 0 … 0.4 to 0 … 25 bar | 0 … 10 to 0 … 40 bar | 0 … 10 to 0 … 40 bar | |||
| Temperature range: | -40 °C to +135 °C | -40 °C to +135 °C | -40 °C to +135 °C | |||
| Features: |
|
|
|
|||
| Cross-section: | ||||||
| Specific features: | →Solderable | →Solderable | →Solderable | |||
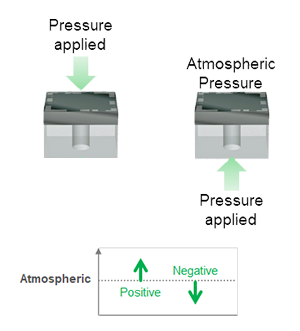
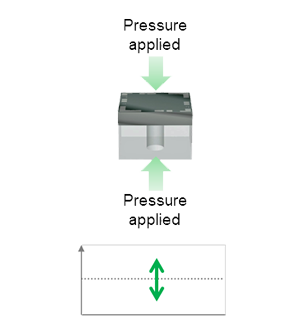
Gauge and differential pressure measurement
Gauge or differential pressure measurement is measuring the difference between the front and the backside. A pressure difference caused by a higher front side pressure leads to a positive change of the output signal. A higher backside pressure leads to a negative change of the output signal.
| Type | C35 | C32 | C38 | C43 | ||||
|---|---|---|---|---|---|---|---|---|
| Dimension: | 2.05 x 2.05 x 1.2 mm³ | 1.65 x 1.65 x 1.1 mm³ | 1.65 x 1.65 x 1.1 mm³ | 1.65 x 1.65 x 1.1 mm³ | ||||
| Media: | Non-aggressive gases and fluids | Non-aggressive gases and fluids | Non-aggressive gases and fluids | Non-aggressive gases and fluids | ||||
| Pressure range: | 0 … 0.1 bar | 0 … 0.4 to 0 … 25 bar | 0 … 10 to 0 … 40 bar | 0 … 10 to 0 … 40 bar | ||||
| Temperature range: | -40 °C to +150 °C | -40 °C to +135 °C | -40 °C to +135 °C | -40 °C to +135 °C | ||||
| Features: |
→High temperature coefficient resistance on request |
→High temperature coefficient resistance on request |
|
→High temperature coefficient resistance on request |
||||
| Cross-section: | ||||||||
| Specific features: |
→Gold bond pads for high temperature and corrosion stability |
|||||||
Applications of Pressure Sensor Dies
| C32 | C33 | C35 | C38 | C39 | C43 | C44 | |||||
|---|---|---|---|---|---|---|---|---|---|---|---|
| Front side absolute | Backside absolute | Gauge/ differential | Front side absolute | Gauge/ differential | Backside absolute | Gauge/ differential | Front side absolute | Front side absolute | Gauge/ differential | Backside absolute | |
| Automotive | × | × | × | × | × | × | × | × | × | × | × |
| Industrial | × | × | × | × | × | × | × | × | × | × | × |
| Medical | × | × | × | × | × | × | × | × | × | × | × |
| Consumer | × | × | × | × | × | ||||||
Contact Information
Related Links
Product Portal
- Sensor Solution Provider
- Wide variety of sensors and sensor systems portfolio as Sensor Solution Provider
- Sensors and Sensor Systems Product Information
- A comprehensive guide to information on Sensors and Sensor Systems from the TDK Group.
- Pressure Sensors Product Information
- A comprehensive guide to information on Pressure Sensors from the TDK Group.
- Pressure Sensor Transmitters Product Information
- A comprehensive guide to informationon Pressure Sensor Transmitters from the TDK Group.
- Barometric Pressure Sensors Product Information
- A comprehensive guide to information on Barometric Pressure Sensors from the TDK Group.


